1. 로컬 PC에서 Vagrant로 CentOS 가상환경 띄우기
설치 환경
- Macbook Pro Intel (2019)
- CentOS 7.9
설치 스크립트
#!/usr/bin/env bash
directory="$HOME/workspace/VM/centos7"
ssh_key_file="$HOME/.ssh/id_rsa"
# Check if Homebrew is installed
if ! [ -x "$(command -v brew)" ]; then
echo '>> Homebrew is not installed.' >&2
/bin/bash -c "$(curl -fsSL https://raw.githubusercontent.com/Homebrew/install/HEAD/install.sh)"
fi
# Check if VirtualBox is installed
if ! [ -x "$(command -v vboxmanage)" ]; then
echo '>> VirtualBox is not installed.' >&2
brew install --cask virtualbox
fi
# Check if VirtualBox Extension Pack is installed
if ! vboxmanage list extpacks | grep "Oracle VM VirtualBox Extension Pack"; then
echo '>> VirtualBox Extension Pack is not installed.'
rm Oracle_VM_VirtualBox_Extension_Pack-$(VBoxManage -v | cut -d r -f 1).vbox-extpack
fi
# Check if Vagrant is installed
if ! [ -x "$(command -v vagrant)" ]; then
echo '>> Vagrant is not installed.' >&2
brew install vagrant
fi
# Check if Ansible is installed
if ! [ -x "$(command -v ansible)" ]; then
echo '>> Ansible is not installed.' >&2
brew install ansible
fi
# Create directory for CentOS VM
if [ ! -d "$directory" ]
then
mkdir -p "$directory"
fi
cd "$directory"
# Check if the required Vagrant plugins are installed
if ! vagrant plugin list | grep -q vagrant-vbguest
then
echo ">> vagrant-vbguest plugin is not installed."
vagrant plugin install vagrant-vbguest
fi
if ! vagrant plugin list | grep -q vagrant-disksize
then
echo ">> vagrant-disksize plugin is not installed."
vagrant plugin install vagrant-disksize
fi
# Initialize Vagrantfile
vagrant init
# Edit Vagrantfile
cat << EOF > Vagrantfile
ENV["LC_ALL"] = "en_US.UTF-8"
Vagrant.configure("2") do |centos|
# All servers will run cent 7
centos.vm.box = "centos/7"
centos.vm.box_check_update = false
centos.disksize.size = "60GB"
# Create the cent1 Server
N = 1
(1..N).each do |i|
hostname = "cent7-#{i}"
centos.vm.define hostname do |host1|
host1.vm.hostname = hostname
host1.vm.network "private_network", ip: "192.168.56.#{10 + i}"
host1.vbguest.auto_update = false
host1.vm.provider "virtualbox" do |v|
v.name = hostname
v.memory = "2048"
v.cpus = "2"
v.linked_clone = "true"
v.gui = "false"
v.customize ['modifyvm', :id, '--graphicscontroller', 'vmsvga']
v.customize ['modifyvm', :id, '--vram', '20']
end
end
end
# Provision with Ansible playbook
centos.vm.provision "ansible" do |ansible|
ansible.playbook = "init.yml"
end
end
EOF
# Edit Ansible playbook
cat << EOF > init.yml
- name: init.yml
hosts: all
gather_facts: no
become: yes
tasks:
- name: Create users
user:
name: "{{ item }}"
shell: /bin/bash
home: "/home/{{ item }}"
generate_ssh_key: true
password_lock: yes
with_items:
- irteam
- irteamsu
- centos
- name: Add sudoers.d file
copy:
content: |
%{{item}} ALL=(ALL) NOPASSWD: ALL
dest: "/etc/sudoers.d/{{item}}"
owner: root
group: root
mode: 0440
validate: "/usr/sbin/visudo -c -f '%s'"
with_items:
- irteam
- irteamsu
- centos
- name: Add SSH key
authorized_key:
user: "{{ item }}"
state: present
key: "{{ lookup('file', '~/.ssh/id_rsa.pub') }}"
with_items:
- irteam
- irteamsu
- centos
- vagrant
- root
- name: Restart SSH service
ansible.builtin.systemd:
state: restarted
name: sshd.service
EOF
# Start Vagrant VM
vagrant up
# Generate SSH key
if [[ ! -f "$ssh_key_file" ]]; then
echo ">> Generating new SSH key..."
ssh-keygen
fi
cat ~/.ssh/id_rsa.pub
cd "$directory"
# SSH into Vagrant VM
vagrant SSH
vagrant ssh -c "cat ~/.ssh/authorized_keys"
vagrant ssh -c 'exit'
# Print public SSH key
cat "$ssh_key_file"
# Provision Vagrant VM
vagrant provision
# Connect
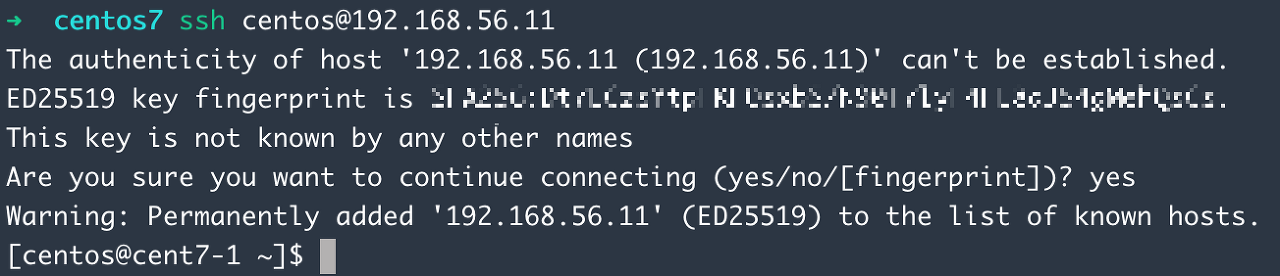
ssh-keyscan -H 192.168.56.11 >> ~/.ssh/known_hosts
ssh -o StrictHostKeyChecking=no centos@192.168.56.11
결과
성공!
2. Ubuntu 인스턴스에서 Vagrant로 CentOS 가상환경 띄우기
설치 환경
- NHN Cloud
- Ubuntu 20.04 LTS
- CentOS 7.9
설치 스크립트
#!/usr/bin/env bash

directory="$HOME/workspace/VM/centos7"
ssh_key_file="$HOME/.ssh/id_rsa"

# Check if wget is installed
if ! command -v wget &> /dev/null
then
    echo ">> wget is not installed."
    sudo apt-get update
    sudo apt-get install -y wget
fi

# Download and add VirtualBox public key

# Add VB repo to package manager

# Update package list
sudo apt-get update

# Install VirtualBox
sudo apt-get install -y virtualbox-6.1

# Clean up
#sudo apt-get autoremove
#sudo apt-get autoclean


# Check if VirtualBox Extension Pack is installed
if ! vboxmanage list extpacks | grep -q "Oracle VM VirtualBox Extension Pack"; then
  echo '>> VirtualBox Extension Pack is not installed.'
  wget https://download.virtualbox.org/virtualbox/6.1.42/Oracle_VM_VirtualBox_Extension_Pack-6.1.42.vbox-extpack
  rm "Oracle_VM_VirtualBox_Extension_Pack-6.1.42.vbox-extpack"
fi

# Check if Vagrant is installed
if ! [ -x "$(command -v vagrant)" ]; then
  echo '>> Vagrant is not installed.' >&2
  wget -O- https://apt.releases.hashicorp.com/gpg | gpg --dearmor | sudo tee /usr/share/keyrings/hashicorp-archive-keyring.gpg
  sudo apt update && sudo apt install -y vagrant
fi

# Check if Ansible is installed
if ! [ -x "$(command -v ansible)" ]; then
  echo '>> Ansible is not installed.' >&2
  sudo apt install -y ansible
fi

# Create directory for CentOS VM
if [ ! -d "$directory" ]
then
    mkdir -p "$directory"
fi

cd "$directory"

# Check if the required Vagrant plugins are installed
if ! vagrant plugin list | grep -q vagrant-vbguest
then
    echo ">> vagrant-vbguest plugin is not installed."
    vagrant plugin install vagrant-vbguest
fi

if ! vagrant plugin list | grep -q vagrant-disksize
then
    echo ">> vagrant-disksize plugin is not installed."
    vagrant plugin install vagrant-disksize
fi

# Initialize Vagrantfile
vagrant init

# Edit Vagrantfile
cat << EOF > Vagrantfile
ENV["LC_ALL"] = "en_US.UTF-8"
Vagrant.configure("2") do |centos|

  # All servers will run cent 7
  centos.vm.box = "centos/7"
  centos.vm.box_check_update = false
  centos.disksize.size = "60GB"

  # Create the cent1 Server
  N = 1
  (1..N).each do |i|
    hostname = "cent7-#{i}"
    centos.vm.define hostname do |host1|
      host1.vm.hostname = hostname
      host1.vm.network "private_network", ip: "192.168.56.#{10 + i}"
      host1.vbguest.auto_update = false
      host1.vm.provider "virtualbox" do |v|
        v.name = hostname
        v.memory = "2048"
        v.cpus = "2"
        v.linked_clone = "true"
        v.gui = "false"
        v.customize ['modifyvm', :id, '--graphicscontroller', 'vmsvga']
        v.customize ['modifyvm', :id, '--vram', '20']
      end
    end
  end

  # Provision with Ansible playbook
  centos.vm.provision "ansible" do |ansible|
    ansible.playbook = "init.yml"
  end
end
EOF

# Edit Ansible playbook
cat << EOF > init.yml
- name: init.yml
  hosts: all
  gather_facts: no
  become: yes
  tasks:
    - name: Create users
      user:
        name: "{{ item }}"
        shell: /bin/bash
        home: "/home/{{ item }}"
        generate_ssh_key: true
        password_lock: yes
      with_items:
        - irteam
        - irteamsu
        - centos
    - name: Add sudoers.d file
      copy:
        content: |
          %{{item}} ALL=(ALL) NOPASSWD: ALL
        dest: "/etc/sudoers.d/{{item}}"
        owner: root
        group: root
        mode: 0440
        validate: "/usr/sbin/visudo -c -f '%s'"
      with_items:
        - irteam
        - irteamsu
        - centos
    - name: Add SSH key
      authorized_key:
        user: "{{ item }}"
        state: present
        key: "{{ lookup('file', '~/.ssh/id_rsa.pub') }}"
      with_items:
        - irteam
        - irteamsu
        - centos
        - vagrant
        - root
    - name: Restart SSH service
      ansible.builtin.systemd:
        state: restarted
        name: sshd.service
EOF

# Start Vagrant VM
vagrant up

# Generate SSH key
if [[ ! -f "$ssh_key_file" ]]; then
    echo ">> Generating new SSH key..."
    ssh-keygen
fi

cat ~/.ssh/id_rsa.pub

cd "$directory"

# SSH into Vagrant VM
vagrant SSH

vagrant ssh -c "cat ~/.ssh/authorized_keys"

vagrant ssh -c 'exit'

# Print public SSH key
cat "$ssh_key_file"

# Provision Vagrant VM
vagrant provision

# Connect
#ssh centos@192.168.56.11
ssh-keyscan -H 192.168.56.11 >> ~/.ssh/known_hosts
ssh -o StrictHostKeyChecking=no centos@192.168.56.11
결과
실패..
에러 상황
- NHN 클라우드 ubuntu 인스턴스에서 vagrant로 centos 가상환경을 띄우려고 함
- vagrant up 단계에서 에러가 발생해 다음 단계로 넘어가지 못 함
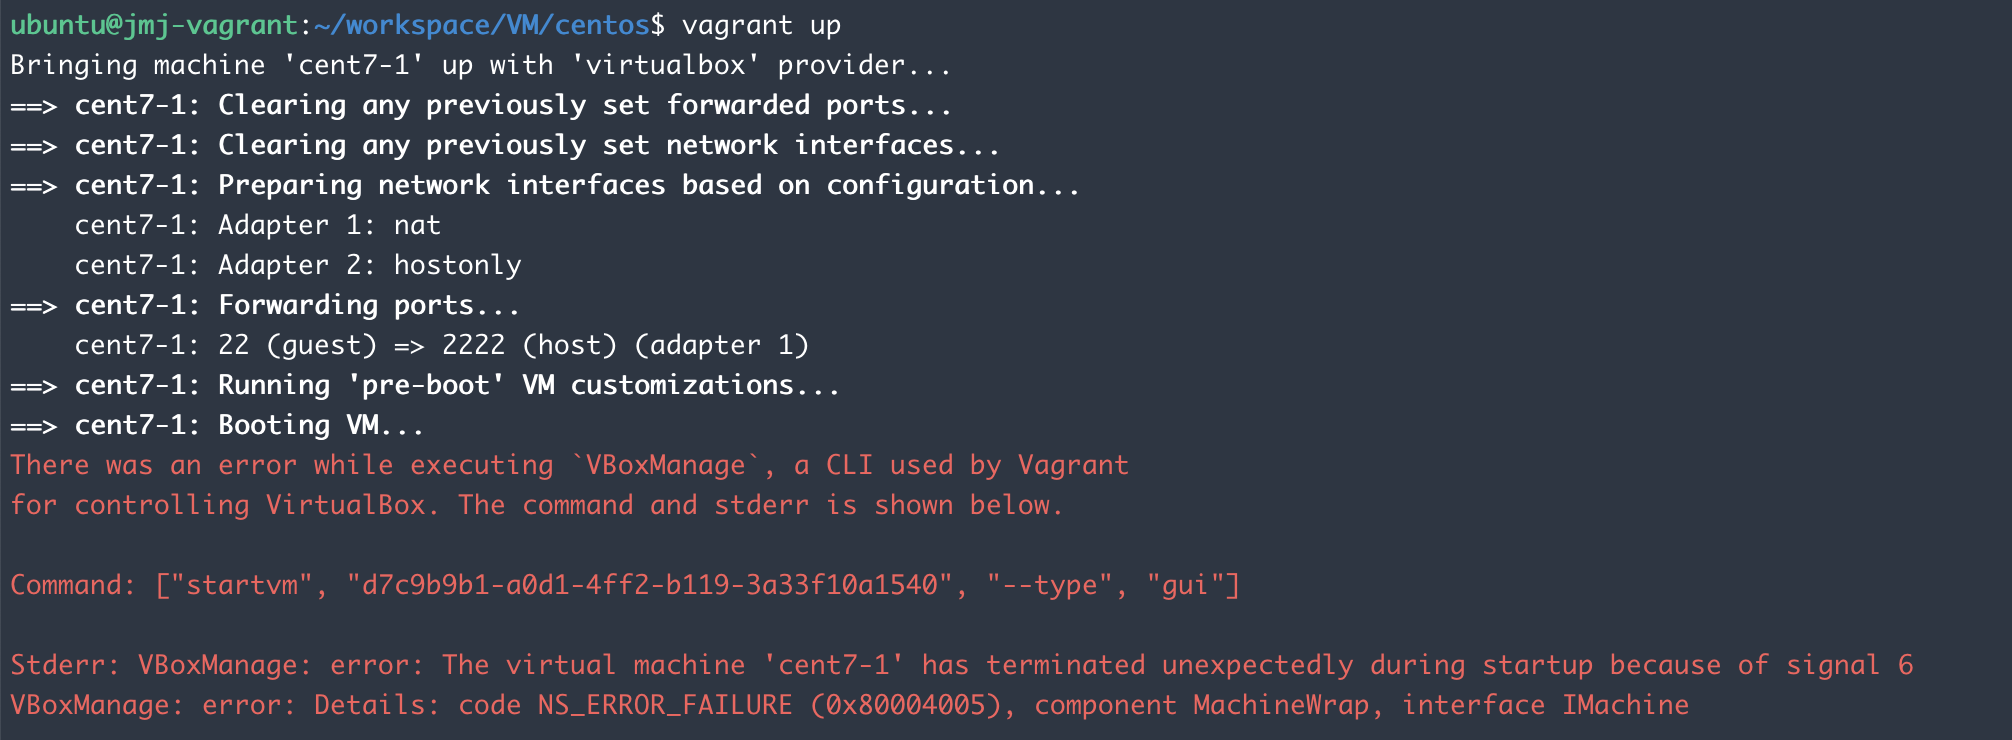
There was an error while executing `VBoxManage`, a CLI used by Vagrant
for controlling VirtualBox. The command and stderr is shown below.

Command: ["startvm", "d7c9b9b1-a0d1-4ff2-b119-3a33f10a1540", "--type", "gui"]

Stderr: VBoxManage: error: The virtual machine 'cent7-1' has terminated unexpectedly during startup because of signal 6
VBoxManage: error: Details: code NS_ERROR_FAILURE (0x80004005), component MachineWrap, interface IMachine
시도해본 방법
- 호스트 재부팅 - 실패
- virtualbox와 virtualbox extension pack 버전 맞추기 - 실패
- VM headless 모드로 시작 - 시도 전
결론
설치를 진행하고 있는 ubuntu 자체가 인스턴스 환경이어서 그 위에 또 가상환경(VM)을 띄우는게 불가능한 것으로 판단..
vagrant 대신 호스트 OS 위에 하이퍼바이저를 띄우지 않는 구조인 docker로 진행하기로 결정!