1. Ubuntu 인스턴스에 CentOS 도커 컨테이너 설치

설치 환경

  • NHN Cloud
  • Ubuntu 20.04 LTS
  • Docker 23.0.1
  • CentOS 7.9


Workflow

  1. 설치하려는 패키지가 이미 설치되어 있는지 체크 후 다운로드
  2. Docker 공식 GPG 키 추가
  3. Docker 레포지토리 등록
  4. apt-get 업데이트
  5. Docker 설치
  6. 그룹에 사용자 추가
  7. CentOS 7 컨테이너 실행


설치 스크립트

#!/usr/bin/env bash

# curl 이미 설치되어 있는지 체크
if ! command -v curl &> /dev/null
then
    sudo apt-get update
    sudo apt-get install -y curl
fi

# apt-transport-https 이미 설치되어 있는지 체크
if ! dpkg -s apt-transport-https &> /dev/null
then
    sudo apt-get update
    sudo apt-get install -y apt-transport-https
fi

# ca-certificates 이미 설치되어 있는지 체크
if ! dpkg -s ca-certificates &> /dev/null
then
    sudo apt-get update
    sudo apt-get install -y ca-certificates
fi

# gnupg-agent 이미 설치되어 있는지 체크
if ! dpkg -s gnupg-agent &> /dev/null
then
    sudo apt-get update
    sudo apt-get install -y gnupg-agent
fi

# software-properties-common 이미 설치되어 있는지 체크
if ! dpkg -s software-properties-common &> /dev/null
then
    sudo apt-get update
    sudo apt-get install -y software-properties-common
fi

# Docker 공식 GPG key 이미 추가되어 있는지 체크
if ! curl -fsSL https://download.docker.com/linux/ubuntu/gpg | sudo apt-key list | grep Docker &> /dev/null
then
    curl -fsSL https://download.docker.com/linux/ubuntu/gpg | sudo gpg --dearmor -o /usr/share/keyrings/docker-archive-keyring.gpg
fi

# Docker repository 등록
if ! apt-cache policy | grep https://download.docker.com/linux/ubuntu | grep stable &> /dev/null
then
  echo \
  "deb [arch=$(dpkg --print-architecture) signed-by=/usr/share/keyrings/docker-archive-keyring.gpg] https://download.docker.com/linux/ubuntu \
  $(lsb_release -cs) stable" | sudo tee /etc/apt/sources.list.d/docker.list > /dev/null
fi

# 기본적인 패키지들이 최신 버전인지 확인
sudo apt-get update

# docker-ce 이미 설치되어 있는지 체크
if ! dpkg -s docker-ce &> /dev/null
then
    # Docker 설치
    sudo apt-get install -y docker-ce docker-ce-cli containerd.io
fi

# docker 그룹에 사용자 추가
sudo usermod -aG docker $USER

# Centos7 컨테이너 실행
sudo docker run --privileged -d -p 5432:5432 --name centos centos:7 /sbin/init
  • systemctl 명령을 사용하기 위해서 privileged로 컨테이너 실행
  • 컨테이너에 postgresql을 설치할 예정이어서 포트 5432로 실행

1. 로컬 PC에서 Vagrant로 CentOS 가상환경 띄우기

설치 환경

  • Macbook Pro Intel (2019)
  • CentOS 7.9


설치 스크립트

#!/usr/bin/env bash

directory="$HOME/workspace/VM/centos7"
ssh_key_file="$HOME/.ssh/id_rsa"

# Check if Homebrew is installed
if ! [ -x "$(command -v brew)" ]; then
  echo '>> Homebrew is not installed.' >&2
  /bin/bash -c "$(curl -fsSL https://raw.githubusercontent.com/Homebrew/install/HEAD/install.sh)"
fi

# Check if VirtualBox is installed
if ! [ -x "$(command -v vboxmanage)" ]; then
  echo '>> VirtualBox is not installed.' >&2
  brew install --cask virtualbox
fi

# Check if VirtualBox Extension Pack is installed
if ! vboxmanage list extpacks | grep "Oracle VM VirtualBox Extension Pack"; then
  echo '>> VirtualBox Extension Pack is not installed.'
  rm Oracle_VM_VirtualBox_Extension_Pack-$(VBoxManage -v | cut -d r -f 1).vbox-extpack
fi

# Check if Vagrant is installed
if ! [ -x "$(command -v vagrant)" ]; then
  echo '>> Vagrant is not installed.' >&2
  brew install vagrant
fi

# Check if Ansible is installed
if ! [ -x "$(command -v ansible)" ]; then
  echo '>> Ansible is not installed.' >&2
  brew install ansible
fi

# Create directory for CentOS VM
if [ ! -d "$directory" ]
then
    mkdir -p "$directory"
fi

cd "$directory"

# Check if the required Vagrant plugins are installed
if ! vagrant plugin list | grep -q vagrant-vbguest
then
    echo ">> vagrant-vbguest plugin is not installed."
    vagrant plugin install vagrant-vbguest
fi

if ! vagrant plugin list | grep -q vagrant-disksize
then
    echo ">> vagrant-disksize plugin is not installed."
    vagrant plugin install vagrant-disksize
fi

# Initialize Vagrantfile
vagrant init

# Edit Vagrantfile
cat << EOF > Vagrantfile
ENV["LC_ALL"] = "en_US.UTF-8"
Vagrant.configure("2") do |centos|

  # All servers will run cent 7
  centos.vm.box = "centos/7"
  centos.vm.box_check_update = false
  centos.disksize.size = "60GB"

  # Create the cent1 Server
  N = 1
  (1..N).each do |i|
    hostname = "cent7-#{i}"
    centos.vm.define hostname do |host1|
      host1.vm.hostname = hostname
      host1.vm.network "private_network", ip: "192.168.56.#{10 + i}"
      host1.vbguest.auto_update = false
      host1.vm.provider "virtualbox" do |v|
        v.name = hostname
        v.memory = "2048"
        v.cpus = "2"
        v.linked_clone = "true"
        v.gui = "false"
        v.customize ['modifyvm', :id, '--graphicscontroller', 'vmsvga']
        v.customize ['modifyvm', :id, '--vram', '20']
      end
    end
  end

  # Provision with Ansible playbook
  centos.vm.provision "ansible" do |ansible|
    ansible.playbook = "init.yml"
  end
end
EOF

# Edit Ansible playbook
cat << EOF > init.yml
- name: init.yml
  hosts: all
  gather_facts: no
  become: yes
  tasks:
    - name: Create users
      user:
        name: "{{ item }}"
        shell: /bin/bash
        home: "/home/{{ item }}"
        generate_ssh_key: true
        password_lock: yes
      with_items:
        - irteam
        - irteamsu
        - centos
    - name: Add sudoers.d file
      copy:
        content: |
          %{{item}} ALL=(ALL) NOPASSWD: ALL
        dest: "/etc/sudoers.d/{{item}}"
        owner: root
        group: root
        mode: 0440
        validate: "/usr/sbin/visudo -c -f '%s'"
      with_items:
        - irteam
        - irteamsu
        - centos
    - name: Add SSH key
      authorized_key:
        user: "{{ item }}"
        state: present
        key: "{{ lookup('file', '~/.ssh/id_rsa.pub') }}"
      with_items:
        - irteam
        - irteamsu
        - centos
        - vagrant
        - root
    - name: Restart SSH service
      ansible.builtin.systemd:
        state: restarted
        name: sshd.service
EOF

# Start Vagrant VM
vagrant up

# Generate SSH key
if [[ ! -f "$ssh_key_file" ]]; then
    echo ">> Generating new SSH key..."
    ssh-keygen
fi

cat ~/.ssh/id_rsa.pub

cd "$directory"

# SSH into Vagrant VM
vagrant SSH

vagrant ssh -c "cat ~/.ssh/authorized_keys"

vagrant ssh -c 'exit'

# Print public SSH key
cat "$ssh_key_file"

# Provision Vagrant VM
vagrant provision

# Connect
ssh-keyscan -H 192.168.56.11 >> ~/.ssh/known_hosts
ssh -o StrictHostKeyChecking=no centos@192.168.56.11


결과

성공!


2. Ubuntu 인스턴스에서 Vagrant로 CentOS 가상환경 띄우기

설치 환경

  • NHN Cloud
  • Ubuntu 20.04 LTS
  • CentOS 7.9


설치 스크립트

#!/usr/bin/env bash

directory="$HOME/workspace/VM/centos7"
ssh_key_file="$HOME/.ssh/id_rsa"

# Check if wget is installed
if ! command -v wget &> /dev/null
then
    echo ">> wget is not installed."
    sudo apt-get update
    sudo apt-get install -y wget
fi

# Download and add VirtualBox public key

# Add VB repo to package manager

# Update package list
sudo apt-get update

# Install VirtualBox
sudo apt-get install -y virtualbox-6.1

# Clean up
#sudo apt-get autoremove
#sudo apt-get autoclean


# Check if VirtualBox Extension Pack is installed
if ! vboxmanage list extpacks | grep -q "Oracle VM VirtualBox Extension Pack"; then
  echo '>> VirtualBox Extension Pack is not installed.'
  wget https://download.virtualbox.org/virtualbox/6.1.42/Oracle_VM_VirtualBox_Extension_Pack-6.1.42.vbox-extpack
  rm "Oracle_VM_VirtualBox_Extension_Pack-6.1.42.vbox-extpack"
fi

# Check if Vagrant is installed
if ! [ -x "$(command -v vagrant)" ]; then
  echo '>> Vagrant is not installed.' >&2
  wget -O- https://apt.releases.hashicorp.com/gpg | gpg --dearmor | sudo tee /usr/share/keyrings/hashicorp-archive-keyring.gpg
  sudo apt update && sudo apt install -y vagrant
fi

# Check if Ansible is installed
if ! [ -x "$(command -v ansible)" ]; then
  echo '>> Ansible is not installed.' >&2
  sudo apt install -y ansible
fi

# Create directory for CentOS VM
if [ ! -d "$directory" ]
then
    mkdir -p "$directory"
fi

cd "$directory"

# Check if the required Vagrant plugins are installed
if ! vagrant plugin list | grep -q vagrant-vbguest
then
    echo ">> vagrant-vbguest plugin is not installed."
    vagrant plugin install vagrant-vbguest
fi

if ! vagrant plugin list | grep -q vagrant-disksize
then
    echo ">> vagrant-disksize plugin is not installed."
    vagrant plugin install vagrant-disksize
fi

# Initialize Vagrantfile
vagrant init

# Edit Vagrantfile
cat << EOF > Vagrantfile
ENV["LC_ALL"] = "en_US.UTF-8"
Vagrant.configure("2") do |centos|

  # All servers will run cent 7
  centos.vm.box = "centos/7"
  centos.vm.box_check_update = false
  centos.disksize.size = "60GB"

  # Create the cent1 Server
  N = 1
  (1..N).each do |i|
    hostname = "cent7-#{i}"
    centos.vm.define hostname do |host1|
      host1.vm.hostname = hostname
      host1.vm.network "private_network", ip: "192.168.56.#{10 + i}"
      host1.vbguest.auto_update = false
      host1.vm.provider "virtualbox" do |v|
        v.name = hostname
        v.memory = "2048"
        v.cpus = "2"
        v.linked_clone = "true"
        v.gui = "false"
        v.customize ['modifyvm', :id, '--graphicscontroller', 'vmsvga']
        v.customize ['modifyvm', :id, '--vram', '20']
      end
    end
  end

  # Provision with Ansible playbook
  centos.vm.provision "ansible" do |ansible|
    ansible.playbook = "init.yml"
  end
end
EOF

# Edit Ansible playbook
cat << EOF > init.yml
- name: init.yml
  hosts: all
  gather_facts: no
  become: yes
  tasks:
    - name: Create users
      user:
        name: "{{ item }}"
        shell: /bin/bash
        home: "/home/{{ item }}"
        generate_ssh_key: true
        password_lock: yes
      with_items:
        - irteam
        - irteamsu
        - centos
    - name: Add sudoers.d file
      copy:
        content: |
          %{{item}} ALL=(ALL) NOPASSWD: ALL
        dest: "/etc/sudoers.d/{{item}}"
        owner: root
        group: root
        mode: 0440
        validate: "/usr/sbin/visudo -c -f '%s'"
      with_items:
        - irteam
        - irteamsu
        - centos
    - name: Add SSH key
      authorized_key:
        user: "{{ item }}"
        state: present
        key: "{{ lookup('file', '~/.ssh/id_rsa.pub') }}"
      with_items:
        - irteam
        - irteamsu
        - centos
        - vagrant
        - root
    - name: Restart SSH service
      ansible.builtin.systemd:
        state: restarted
        name: sshd.service
EOF

# Start Vagrant VM
vagrant up

# Generate SSH key
if [[ ! -f "$ssh_key_file" ]]; then
    echo ">> Generating new SSH key..."
    ssh-keygen
fi

cat ~/.ssh/id_rsa.pub

cd "$directory"

# SSH into Vagrant VM
vagrant SSH

vagrant ssh -c "cat ~/.ssh/authorized_keys"

vagrant ssh -c 'exit'

# Print public SSH key
cat "$ssh_key_file"

# Provision Vagrant VM
vagrant provision

# Connect
#ssh centos@192.168.56.11
ssh-keyscan -H 192.168.56.11 >> ~/.ssh/known_hosts
ssh -o StrictHostKeyChecking=no centos@192.168.56.11


결과

실패..


에러 상황

  • NHN 클라우드 ubuntu 인스턴스에서 vagrant로 centos 가상환경을 띄우려고 함
  • vagrant up 단계에서 에러가 발생해 다음 단계로 넘어가지 못 함

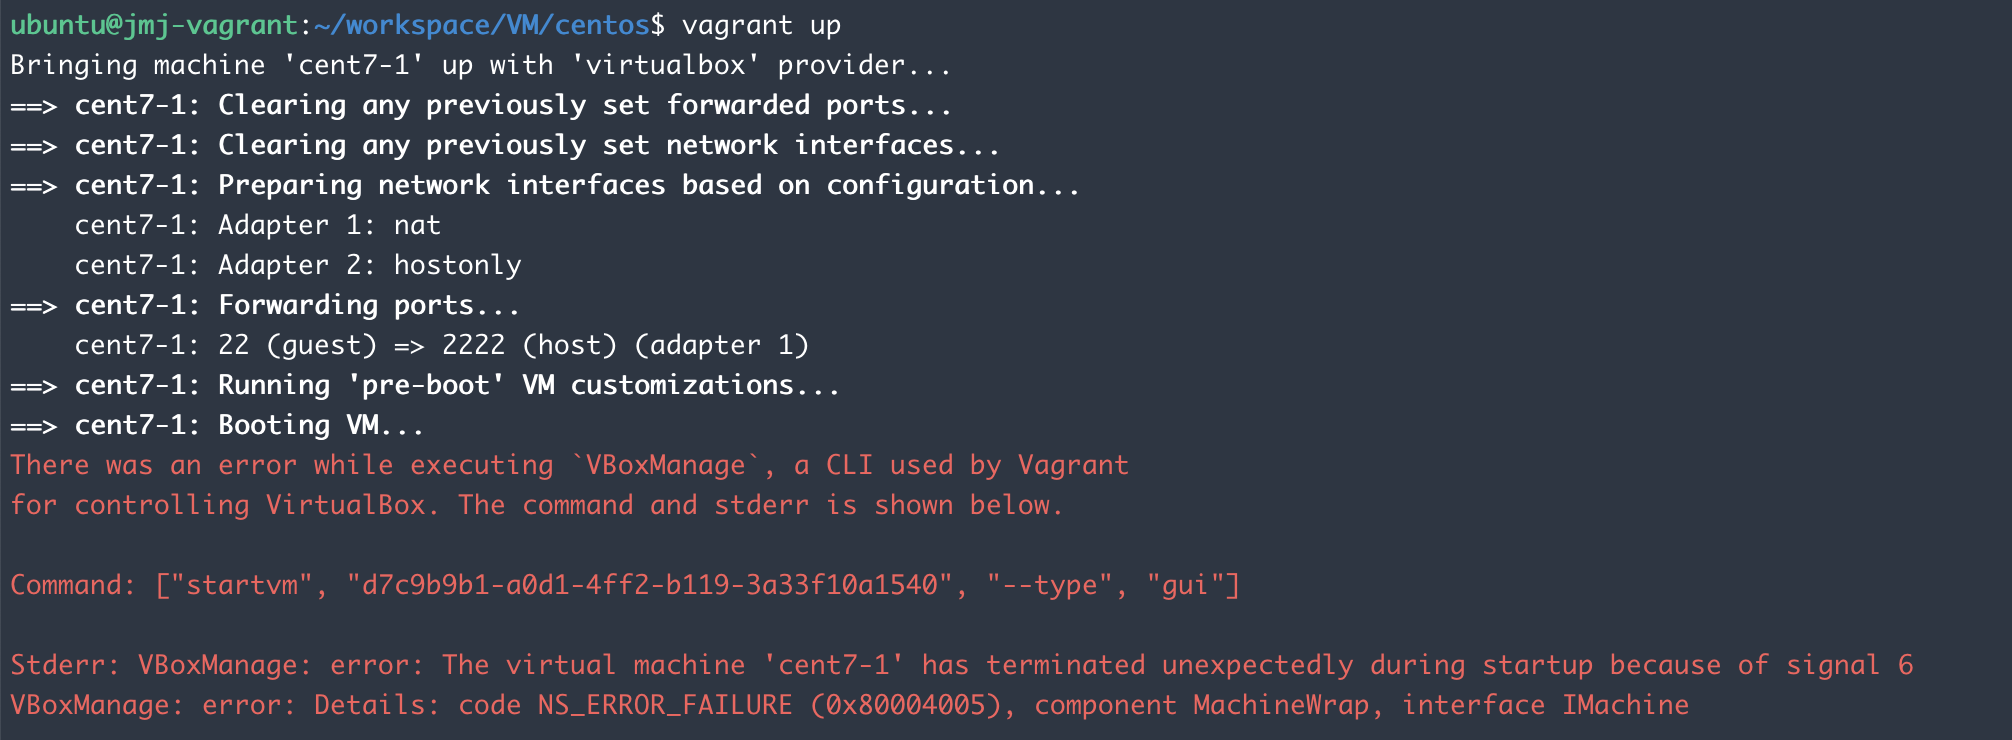
There was an error while executing `VBoxManage`, a CLI used by Vagrant
for controlling VirtualBox. The command and stderr is shown below.

Command: ["startvm", "d7c9b9b1-a0d1-4ff2-b119-3a33f10a1540", "--type", "gui"]

Stderr: VBoxManage: error: The virtual machine 'cent7-1' has terminated unexpectedly during startup because of signal 6
VBoxManage: error: Details: code NS_ERROR_FAILURE (0x80004005), component MachineWrap, interface IMachine


시도해본 방법

  • 호스트 재부팅 - 실패
  • virtualbox와 virtualbox extension pack 버전 맞추기 - 실패
  • VM headless 모드로 시작 - 시도 전


결론

설치를 진행하고 있는 ubuntu 자체가 인스턴스 환경이어서 그 위에 또 가상환경(VM)을 띄우는게 불가능한 것으로 판단..

vagrant 대신 호스트 OS 위에 하이퍼바이저를 띄우지 않는 구조인 docker로 진행하기로 결정!

1. 문제 상황

CentOS 7에서 방화벽 관련 포트나 서비스를 열거나 닫을 때, firewalld 명령어를 사용한다.

최소 설치를 했을 때에는 자동으로 설치되지 않기 때문에 firewalld 명령어를 사용했을 때,

firewall-cmd: command not found라는 에러가 발생한다. 


2. 해결 방법

아래 명령으로 필요한 패키지를 설치하면 해결 완료!

yum install firewalld


3. 사용법

systemctl unmask firewalld
systemctl enable firewalld
systemctl start firewalld


참고 사이트

1. 문제 상황

Ubuntu, CentOS와 같은 Linux에서 netstat 명령어를 실행했을 때
bash: netstat: command not found 오류를 해결하고자 한다!


2. 해결 방법
ifconfig, netstat 등 네트워크 관련 명령어의 경우 net-tools 패키지를 설치해야 한다.

  • Ubuntu
apt install net-tools
  • CentOS
yum install net-tools


참고 사이트

CentOS 7.9 환경에 PostgreSQL 8.4.0 버전을 설치하는 중 ./configure를 실행하니 다음과 같은 에러가 발생했다.

checking for gcc... no
checking for cc... no
configure: error: no acceptable C compiler found in $PATH
See `config.log' for more details.


gcc나 cc가 없어서 나는 에러인 것 같다.


아래 코드를 실행해 필요한 컴파일러를 설치해준다.

sudo yum install gcc glibc glibc-common gd gd-devel


설치 후 다시 configure를 해보면 잘 실행된다!


참고링크

https://sojinhwan0207.tistory.com/90

+ Recent posts